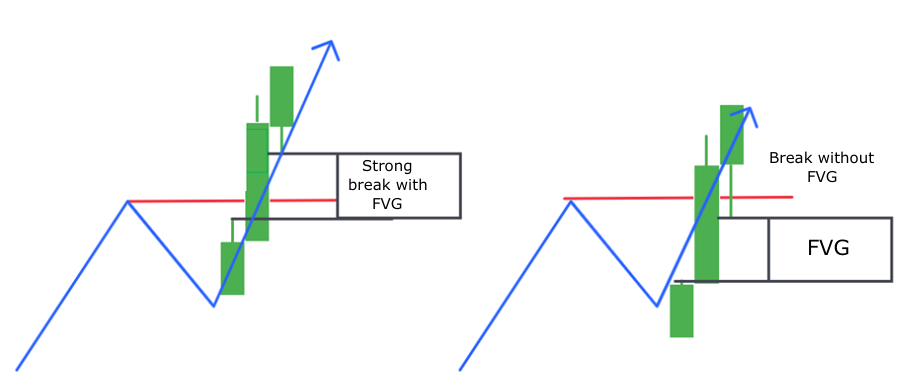
In modern price action trading—especially within the framework of ICT (Inner Circle Trader) concepts—Fair Value Gaps (FVGs) have become a cornerstone for understanding market inefficiencies and predicting future price movements. These imbalances occur when price moves so rapidly that not all orders are filled, leaving a “gap” between candles on a lower timeframe.
Understanding FVGs is essential for traders who rely on institutional order flow, smart money concepts (SMC), and liquidity-based setups. In this article, we’ll dive deep into what Fair Value Gaps are, how they form, why they get filled, and how professional traders use them for high-probability trade executions.
What is a Fair Value Gap (FVG)?
A Fair Value Gap represents an area on the price chart where the market moved so aggressively in one direction that it skipped over a range of prices—creating an imbalance between buyers and sellers.
This usually occurs in a three-candle pattern:
- Candle 1 (Previous Candle): The initial point before the strong move.
- Candle 2 (Impulse Candle): A large bullish or bearish candle that breaks structure or moves with high momentum.
- Candle 3 (Next Candle): A smaller candle that fails to overlap the opposite wick of Candle 1.
Example (Bullish FVG):
If the low of Candle 3 is higher than the high of Candle 1, the zone between them is a bullish fair value gap—an area where buyers dominated so strongly that price didn’t retest intermediate levels.
Example (Bearish FVG):
If the high of Candle 3 is lower than the low of Candle 1, the zone between them is a bearish fair value gap—an area of extreme selling pressure.
The Logic Behind FVGs: Institutional Order Flow
Markets are moved primarily by institutional traders—banks, hedge funds, and large liquidity providers. When they enter positions, their orders are massive and cannot be filled instantly at one price.
An FVG occurs when their large orders sweep through liquidity so fast that counterpart orders aren’t available, causing an imbalance. Later, when the market slows, institutions often revisit these zones to fill remaining orders.
That’s why price tends to “return” to Fair Value Gaps—it’s not random, it’s a result of institutional rebalancing.
Why FVGs Get Filled
There are several key reasons why Fair Value Gaps often act as magnets for price:
- Liquidity Collection: The market revisits the gap to grab unfilled orders left behind during the impulsive move.
- Market Efficiency: The price seeks balance—correcting the inefficiency caused by one-sided movement.
- Smart Money Re-entry: Institutions often re-enter positions or scale in around these zones for optimal entries.
- Retail Trap: Many retail traders chase momentum, but smart money fades the move when price returns to the FVG.
How to Identify and Draw an FVG
- Switch to a clear timeframe (e.g., 1H or 15M).
- Look for three consecutive candles that show an impulsive move.
- Measure the gap between Candle 1’s high and Candle 3’s low (for bullish FVG), or Candle 1’s low and Candle 3’s high (for bearish FVG).
- Mark the zone as a rectangle.
- Observe how price reacts when revisiting this area.
Tip: Combine your FVG zones with market structure, breaker blocks, or liquidity pools to increase accuracy.

Trading Fair Value Gaps: Step-by-Step Strategy
1. Identify Market Direction: Use structure analysis:
- Higher highs and higher lows → Bullish bias.
- Lower highs and lower lows → Bearish bias.
2. Locate Valid FVGs: Spot the latest imbalances that align with your directional bias. Avoid very old gaps unless they remain untouched.
3. Wait for Price to Return: Don’t enter immediately after identifying an FVG. Wait for price to retrace into the gap zone.
4. Confirm with Entry Model: Use confirmation signals like:
- Displacement candle on lower timeframe.
- Break of structure (BOS) or CHoCH (Change of Character) near the gap.
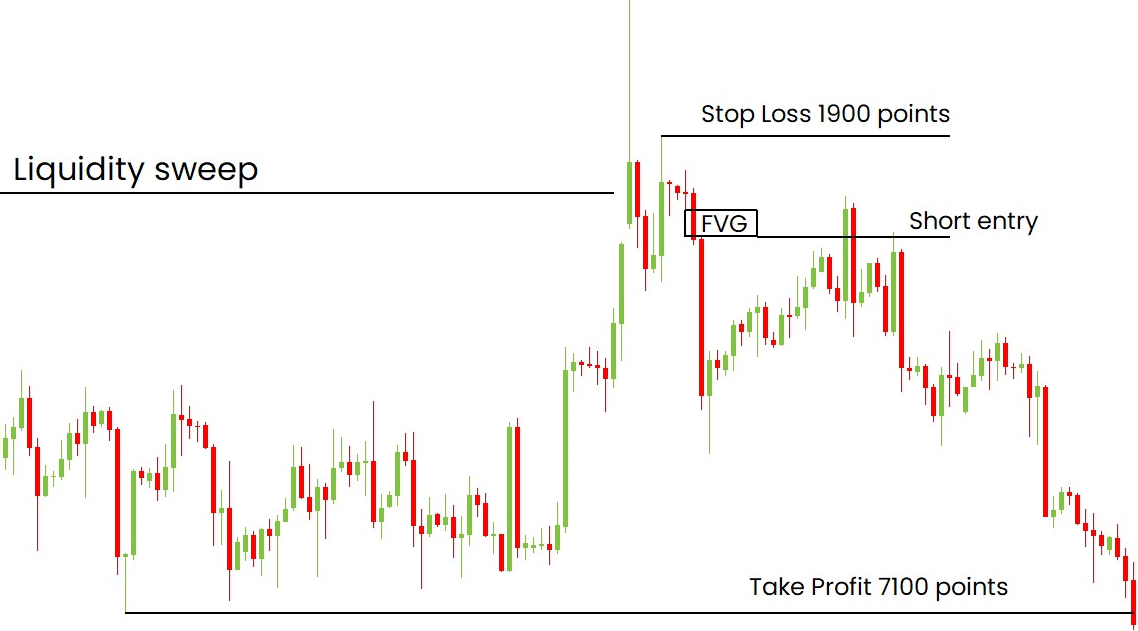
- Liquidity sweep before entry.
5. Entry & Stop Placement
- Entry: Inside the FVG, ideally near the midpoint (the “mean threshold”).
- Stop Loss: Below (for buys) or above (for sells) the FVG zone.
- Take Profit: Target the next liquidity pool, order block, or previous high/low.

Combining FVGs with Other Concepts
1. Liquidity & FVG
Liquidity sits above highs and below lows. Price often sweeps liquidity before returning to fill an FVG.
→ Entry example: Wait for liquidity grab, then entry from FVG.
2. Breaker Block + FVG
When an FVG overlaps a breaker block, the confluence is strong—it signals institutional re-entry with precise control zones.
3. Imbalance + Fair Value Gap
While “Imbalance” generally refers to uneven price movement, FVG is a specific visual type of imbalance. Using both helps confirm trade zones.
Practical Example
Imagine EUR/USD forms a large bullish candle on the 15-minute chart after news release:
- Candle 1 high: 1.0700
- Candle 3 low: 1.0710
Between 1.0700 – 1.0710 lies a bullish FVG. After a short pullback, price returns to 1.0705, fills part of the imbalance, and continues upward — confirming institutional rebalancing.
Mistakes to Avoid
- Trading every FVG blindly – not every gap is valid; confirm with structure and liquidity.
- Ignoring timeframes – use multi-timeframe alignment for higher accuracy.
- Forgetting context – FVGs inside a range are less reliable than those forming after a structural break.
- Late entries – once price fully rebalances, the opportunity is gone.
Fair Value Gaps reveal hidden institutional footprints in price action. When analyzed properly, they provide traders with precise entry zones, low-risk opportunities, and a clear understanding of market inefficiency.Mastering FVGs requires patience and confluence—aligning gaps with structure, liquidity, and timing models. Used effectively, FVGs can transform your trading approach from random entries to institutionally aligned precision trading.
.png)